Since I've had a number of requests for help getting started with blogger, I'm going to do a "step-by-step" with pictures and text for those who have never ever even looked at or know what a blog is.
Before you start a blog, you need to decide what your subject will be - what you are going write about and put in your blog. What it shouldn't be is something you have no clue about: if you aren't doctor or nurse or paramedic, don't write about medical stuff. If you've never earned a penny doing something online, then don't write about earning money online. Select a subject you have some knowledge about, or something you enjoy. If you have a hobby, like diecast toys or antiques, then write about that. If you are simply a mom whose kids have given her tons of hilarious things to write about (like Erma Bombeck), then write about that. Whatever it is you choose, you have to be able to write from knowledge and experience. Don't think you can start a blog and copy stuff from all over the internet. That just won't fly for AdSense.
So, now that you've picked a subject you have to decide on a name for your blog. Think of a couple that match your subject matter, mainly because someone else may already have a blog with the name you pick, so you want to be ready with a second choice. Or, you can simply use your name, like "Gracey's" or "What Gracey Thinks".
To begin you have to sign up so you type www.blogger.com into your search bar and find the home/sign up page. Then, you sign up for a free account, and when your registration is complete you'll be presented with a "blogger dashboard" (click the images to see a larger view).
 On the dashboard, you can select your language, and click the "create a blog link".
Next you'll be presented with a page where you name your blog, and select the URL (blog address or web address) that you'll use for your new blog. When you type in the blog name and URL (the url can be the same as your blog name if nobody is using it) click the link to check if it's available. If so, you can continue and fill in the captcha letters. If someone else is using it, you have to pick a new one and try again.
Once you click the "continue" button you'll be presented with a page where you can pick a blog template - this is the design or the way the blog will look.

Select a design by clicking the button under it. It doesn't really matter much what you choose to get started with - changing the template later is easy, and takes nothing more than clicking a button. Customized template designs are something for those with a litle experience, so we're starting with the basics offered in blogger.
Click continue and you'll get a page like this:

So now the basic layout and setup has been finished and your blog is ready for you to start typing in. Click the start blogging button and it takes you to a page where you can enter your first post.
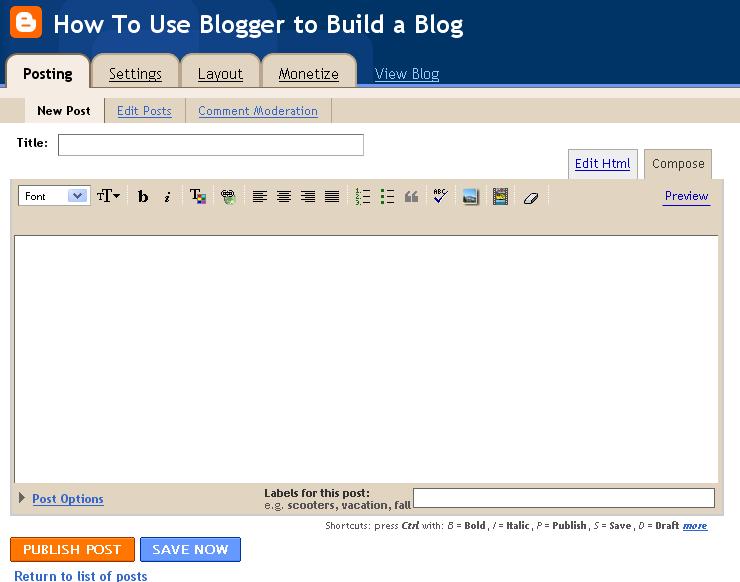
This is the "blog editor" or "wysiwyg editor". It's what you'll use to enter information and images, even videos into your posts.
Across the top of the editor are options like "font" (in a drop down box) where you pick the type of lettering you want, next is a large and small T with an arrow - when you click that you make your text bigger or smaller.
The "b" lets you make bold text (highlight the text by clicking, holding down your mouse button and dragging across all the text you want to make bold, then click on the "b"); the little i gives you italic text (done the same way as you get bold).
The T with the coloured box changes your text colour; the small globe with the chain link across the top helps you make links.
The next series with all those little lines let you decide whether your text starts at the left (left justified), or is centered, or is right justified, or is justified across the entire page.
The small lines with numbers next to them lets you make a numbered list, the ones with little squares lets you make a bulleted list.
The quotation lets you make a block quote, and the ABC with the check mark is a spell-checker. Next to that is a tiny picture - click that to insert an image from your computer or an address on the internet. The next little picture lets you add a video, and the last icon - is an eraser that removes formatting from a specific selection of text.
Okay, so now you know it all. Well, not exactly, but you should have an idea of how to get started.
 To write your first post, you simply start typing in the editor's text box. It works like most text boxes.
When you are finished entering your article, or story or text, you can add labels for your post. This helps search engines and readers find your content - labels work a little bit like keywords do. Then, you click "publish post" and you can click the "view blog" link at the top to see your blog with it's first post.

There are a lot of things not covered here because this post is already very long. The next one will cover the settings in your blog, and how to change the header to use an image, how to change the colour of the the navbar (that bar at the top), how to add gadgets to your sidebar and other fine-tuning details of setting up a blog that not only has good and interesting articles, but that looks good too.
Until then, make some posts and explore your blogger options. Oh - one thing - don't mess with the templates html unless you know what you are doing, and DO NOT, DO NOT, DO NOT try to monetize your blog at this point. Leave that until you've got some content worthy of having advertising on it.
0 comments:
Post a Comment